

Magento 2 Backend:在系统配置中创建表(设置)的指南
《Magento2.X企业级开发实战》
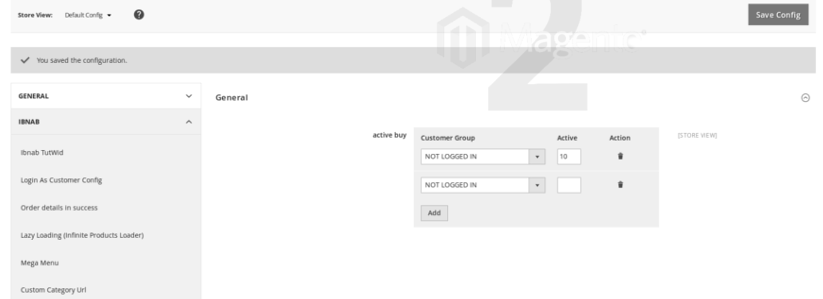
本文为大家介绍如何在magento后台添加一个新的配置选项
Magento 2 带有许多在版本 1 中已经存在的技术,但有新的实现方式,系统配置中的这种灵活的表(网格)之一。
我们假设您已经创建了模块,我们从 Ibnab/Table/etc/adminhtml/system.xml 中的 system.xml 开始
1 – 创建字段:
所以我们需要在 system.xml 中添加这部分代码:
<field id="active" translate="label" sortOrder="220" showInDefault="1" showInWebsite="1" showInStore="0">
                    <label>active buy</label>
                    <frontend_model>Ibnab\Table\Block\System\Config\Form\Field\Active</frontend_model>
                    <backend_model>Magento\Config\Model\Config\Backend\Serialized\ArraySerialized</backend_model>
                </field>
frontend_model : 负责渲染表列内容的块
backend_model :它用于以序列化格式从数据库中保存和加载数据,使用可以使用标准 Magento\Config\Model\Config\Backend\Serialized\ArraySerialized ,或创建自己的像:
Magento\Braintree\Model\System\Config\Backend\Countrycreditcard
2 – 创建前端模型:
我们需要在 Ibnab/Table/Block/System/Form/Field 文件夹中创建我们的类,在这里创建块 Active.php 并填充:
<?php
namespace Ibnab\Table\Block\System\Config\Form\Field;
class Active extends \Magento\Config\Block\System\Config\Form\Field\FieldArray\AbstractFieldArray {
    /**
     * Grid columns
     *
     * @var array
     */
    protected $_columns = [];
    protected $_customerGroupRenderer;
    /**
     * Enable the "Add after" button or not
     *
     * @var bool
     */
    protected $_addAfter = true;
     /**
     * Label of add button
     *
     * @var string
     */
    protected $_addButtonLabel;
    /**
     * Check if columns are defined, set template
     *
     * @return void
     */
    protected function _construct() {
        parent::_construct();
        $this->_addButtonLabel = __('Add');
    }
    /**
     * Returns renderer for country element
     *
     * @return \Magento\Braintree\Block\Adminhtml\Form\Field\Countries
     */
    protected function getCustomerGroupRenderer() {
        if (!$this->_customerGroupRenderer) {
            $this->_customerGroupRenderer = $this->getLayout()->createBlock(
                    '\Ibnab\Table\Block\Adminhtml\Form\Field\CustomerGroup', '', ['data' => ['is_render_to_js_template' => true]]
            );
        }
        return $this->_customerGroupRenderer;
    }
    /**
     * Prepare to render
     *
     * @return void
     */
    protected function _prepareToRender() {
        $this->addColumn(
                'customer_group', [
            'label' => __('Customer Group'),
            'renderer' => $this->getCustomerGroupRenderer(),
                ]
        );
        $this->addColumn('active', array('label' => __('Active')));
        $this->_addAfter = false;
        $this->_addButtonLabel = __('Add');
    }
    protected function _prepareArrayRow(\Magento\Framework\DataObject $row) {
        $customerGroup = $row->getCustomerGroup();
        $options = [];
        if ($customerGroup) {
            $options['option_' . $this->getCustomerGroupRenderer()->calcOptionHash($customerGroup)] = 'selected="selected"';
        }
        $row->setData('option_extra_attrs', $options);
        }
    /**
     * Render array cell for prototypeJS template
     *
     * @param string $columnName
     * @return string
     * @throws \Exception
     */
    public function renderCellTemplate($columnName)
    {
        if ($columnName == "active") {
            $this->_columns[$columnName]['class'] = 'input-text required-entry validate-number';
            $this->_columns[$columnName]['style'] = 'width:50px';
        }
        return parent::renderCellTemplate($columnName);
    }
}
我们的类扩展了 \Magento\Config\Block\System\Config\Form\Field\FieldArray\AbstractFieldArray 是的,我们需要表字段。
我们这里有许多重要的函数(这里的 1 个函数需要覆盖父函数来声明您的自定义列 _prepareToRender() ):
 protected function _prepareToRender() {
        $this->addColumn(
                'customer_group', [
            'label' => __('Customer Group'),
            'renderer' => $this->getCustomerGroupRenderer(),
                ]
        );
        $this->addColumn('active', array('label' => __('Active')));
        $this->_addAfter = false;
        $this->_addButtonLabel = __('Add');
    }
在这里,我们声明我们的自定义列“输入字段”,第一个是我们与自定义渲染器相关的选择字段,函数 get CustomerGroup Renderer() (我们回到它)
和默认输入文本:
$this->addColumn('active', array('label' => __('Active')));我们使用 parent 的功能:
 public function addColumn($name, $params)
    {
        $this->_columns[$name] = [
            'label' => $this->_getParam($params, 'label', 'Column'),
            'size' => $this->_getParam($params, 'size', false),
            'style' => $this->_getParam($params, 'style'),
            'class' => $this->_getParam($params, 'class'),
            'renderer' => false,
        ];
        if (!empty($params['renderer']) && $params['renderer'] instanceof \Magento\Framework\View\Element\AbstractBlock) {
            $this->_columns[$name]['renderer'] = $params['renderer'];
        }
    }
父函数查找是否有它使用的自定义渲染器,如果没有,它使用默认输入文本字段,如我们的案例活动字段。
我们回到我们的渲染器来声明我们的第一个列:
$this->addColumn(
                'customer_group', [
            'label' => __('Customer Group'),
            'renderer' => $this->getCustomerGroupRenderer(),
                ]
        );
function是:
protected function getCustomerGroupRenderer() {
        if (!$this->_paymentMethodRenderer) {
            $this->_paymentMethodRenderer = $this->getLayout()->createBlock(
                    '\Ibnab\Table\Block\Adminhtml\Form\Field\CustomerGroup', '', ['data' => ['is_render_to_js_template' => true]]
            );
        }
        return $this->_paymentMethodRenderer;
    }
是的,我们使用自定义块来显示我们的字段 (\Ibnab\Table\Block\Adminhtml\Form\Field\CustomerGroup),内容是:
<?php

namespace Ibnab\Table\Block\Adminhtml\Form\Field;

class CustomerGroup extends \Magento\Framework\View\Element\Html\Select {
   /**
     * methodList
     *
     * @var array
     */
    protected $groupfactory;
   /**
     * Constructor
     *
     * @param \Magento\Framework\View\Element\Context $context
     * @param \Magento\Braintree\Model\System\Config\Source\Country $countrySource
     * @param \Magento\Directory\Model\ResourceModel\Country\CollectionFactory $countryCollectionFactory
     * @param array $data
     */
    public function __construct(
    \Magento\Framework\View\Element\Context $context, \Magento\Customer\Model\GroupFactory $groupfactory, array $data = []
    ) {
        parent::__construct($context, $data);
        $this->groupfactory = $groupfactory;
    }
    /**
     * Returns countries array
     *
     * @return array
     */
     /**
     * Render block HTML
     *
     * @return string
     */
    public function _toHtml() {
        if (!$this->getOptions()) {
            $customerGroupCollection = $this->groupfactory->create()->getCollection();
            foreach ($customerGroupCollection as $customerGroup) {
                     $this->addOption($customerGroup->getCustomerGroupId(), $customerGroup->getCustomerGroupCode());
            }
        }
        return parent::_toHtml();
    }
    /**
     * Sets name for input element
     *
     * @param string $value
     * @return $this
     */
    public function setInputName($value) {
        return $this->setName($value);
    }
}
我们的块扩展 \Magento\Framework\View\Element\Html\Select ,我们想要选择字段元素,
在构造中,我们注入客户组工厂并在公共函数 _toHtml() 中使用以填充选择输入框:
public function _toHtml() {
        if (!$this->getOptions()) {
            $customerGroupCollection = $this->groupfactory->create()->getCollection();
            foreach ($customerGroupCollection as $customerGroup) {
                     $this->addOption($customerGroup->getCustomerGroupId(), $customerGroup->getCustomerGroupCode());
            }
        }
        return parent::_toHtml();
    }
回到我们的数组表并探索功能:
protected function _prepareArrayRow(\Magento\Framework\DataObject $row) {
        $customerGroup = $row->getCustomerGroup();
        $options = [];
        if ($paymentMethod) {
            $options['option_' . $this->getCustomerGroupRenderer()->calcOptionHash($customerGroup)] = 'selected="selected"';
        }
        $row->setData('option_extra_attrs', $options);
        }
我们用于在我们的选择字段元素中选择当前选择的选项。
3 – 添加验证:
您可以在保存序列化值之前添加验证,添加功能:
 public function renderCellTemplate($columnName)
    {
        if ($columnName == "active") {
            $this->_columns[$columnName]['class'] = 'input-text required-entry validate-number';
            $this->_columns[$columnName]['style'] = 'width:50px';
        }
        return parent::renderCellTemplate($columnName);
    }
在这里我们验证活动字段是必需的和数字类型。
4 – 如何使用配置值:
首先在要使用配置的类中注入 $scopeConfig :
\Magento\Framework\App\Config\ScopeConfigInterface $scopeConfig
$tableConfig = $this->scopeConfig->getValue('ibnab_activebuy_config/general/active', ScopeConfigInterface::SCOPE_TYPE_DEFAULT);
if ($tableConfig) :
    $tableConfigResults = unserialize($tableConfig);
    if (is_array($tableConfigResults)) {
        foreach($tableConfigResults as $tableConfigResult) {
            $customer_group = $tableConfigResult['customer_group'];
            $active = $tableConfigResult['active'];
        }
    endif;
}
以上就是
Magento 2 Backend:在系统配置中创建表(设置)的指南
本文来源于:【Magento中文网】,并添加本文地址链接。
如未按上述操作复制或转载,本站有权追究法律责任。
若本站内容侵犯了原著者的合法权益,可联系我们进行处理。